
Queue Managers:
You may have to work on large number of queue managers simultaneously. To organize them depending upon the function or by region or by any other factor, you may want to categorize all the queue managers in different categories. For more information about how to set categories, please refer to Categories.
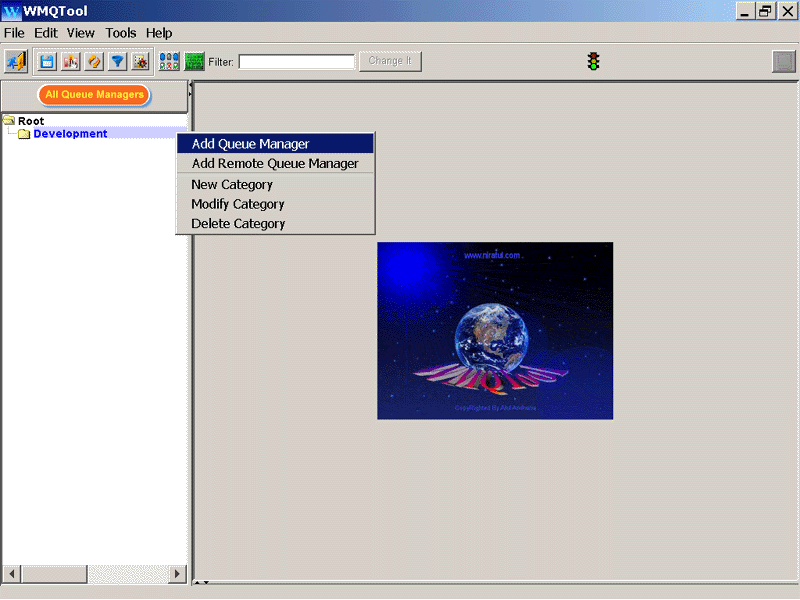
To add a new queue manager entry…
|
1. |
Right click on any category under which you want to add new queue manager. |
|
2. |
Click on ‘Add Queue Manager’. Another window in the middle of the screen will appear. |
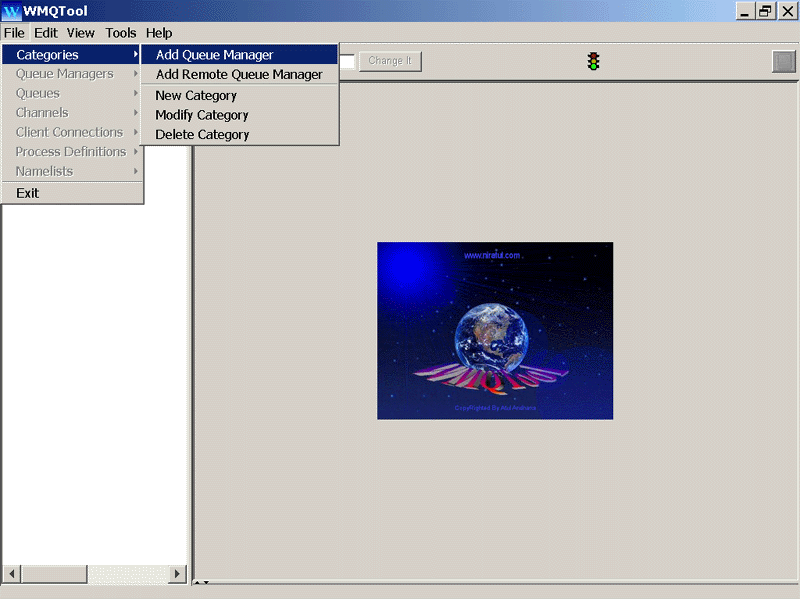
Alternatively, you can select File/Categories/Add Queue Manager as follows.
If you see all the options deactivated in the popup menu like follows...
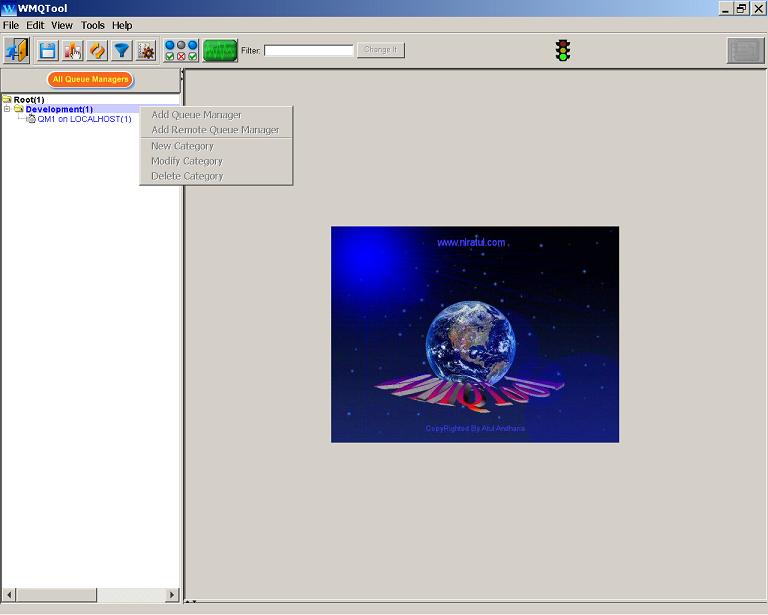
...you have to add/modify/remove the queue manager connection information by selecting 'Tools/Set Authorities/Shared file' and then click on 'Set Queue Manager Tree'.
Adding a queue manager screen looks like follows.
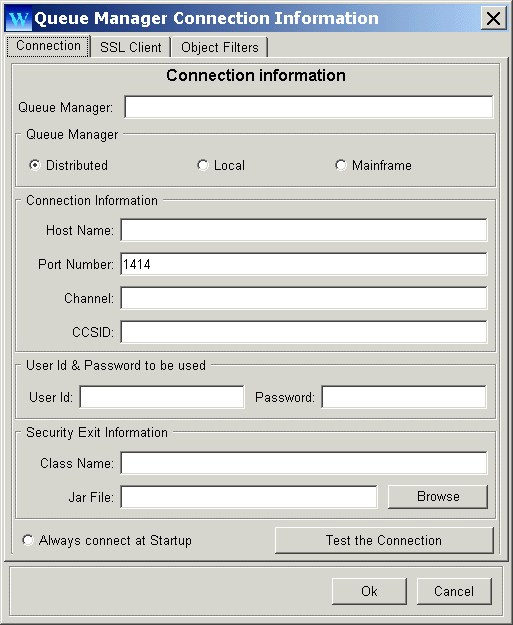
Following information can be provided for queue manager connection.
There are three tab pages for queue manager connection information. Connection, SSL Client and Object Filters.
Connection tab page:
Connection tab page consists of following fields just like displayed above.
| Queue Manager Name: |
The name of the queue manager to be connected. |
| Type of queue manager: |
You can select from Distributed, Local or Mainframe radio buttons. Any queue manager which is not a Local or Mainframe queue manager, should be selected as Distributed. When you check mark the box for Local Queue Manager, Host Name, Port Number and Channel fields are deactivated because they are not required. The local queue manager will be connected in binding mode. In queue manager tree, a local queue manager is displayed with host name as "LOCALHOST" and port number as the serial number of queue manager. For example, when the first local queue manager is defined, its host name and port number will be shown as "LOCALHOST(1)". For second, port number is given as 2 and so on. These port numbers are for display purpose only. To connect a local queue manager only queue manager name is required. Host name, port number and channel are not required to connect in binding mode. A queue manager already defined having host name as "LOCALHOST" will be considered as a local queue manager. If you modify such queue manager, its port number will be changed by WMQTool automatically. When
you mark the check box for Mainframe or OS/390, the queue manager
icon displayed in queue manager tree will be in blue color
like |
| Host Name: |
You can enter the host name here. If you enter 'LOCALHOST', WMQTool will automatically convert this queue manager type as 'Local' when you save this connection information by clicking on 'Ok' button. |
|
Port Number: |
Enter port no here. The default port no is set to 1414. |
|
CCSID: |
CharacterCodedSetID of the queue manager. |
|
Channel: |
You can enter the server connection channel name you want WMQTool to connect to. But it is optional. If you do not enter channel name here, WMQTool will first try to connect thru the server connection channel that of queue manager name and if it fails, it tries to connect thru SYSTEM.ADMIN.SVRCONN channel. In earlier versions, WMQTool also tried to connect thru SYSTEM.DEF.SVRCONN channel. But from version 4.0, this channel is no longer used for that purpose. This channel is used to connect any queue manager ONLY when you run 'Retrieve Queue Managers from the network' option on 'Select Queue Manager Tree' option while creating a shared file. |
|
User Id: |
You can enter userid to be used while connecting the queue manager. When you specify Security Exit information, this userid is ignored. |
|
Password: |
Password for the userid, if entered. |
|
Class Name: |
Enter the class name of user-defined security exit's Client part written and compiled in Java. Please be sure to enter the exact class name with case-sensitive. This class name must have following two methods in it to set userid and password. public void setUserId(String userid) public void setPassword(String password) WMQTool will pass userid and password using these two methods to this Client Security Exit class. You should use them in your class appropriately. Refer to WebSphere MQ documentation for more information. |
|
Jar File: |
Enter or select by clicking on Browse button, the name of jar file with absolute path. |
|
Always Connect at Startup: |
Check mark this radio button if you want this queue manager to be started automatically whenever you start WMQTool. |
|
Test the Connection: |
Click on this button if you want to test the connection of the queue manager. This way, you can verify that the information you entered is correct or not. |
SSL Client tab page:
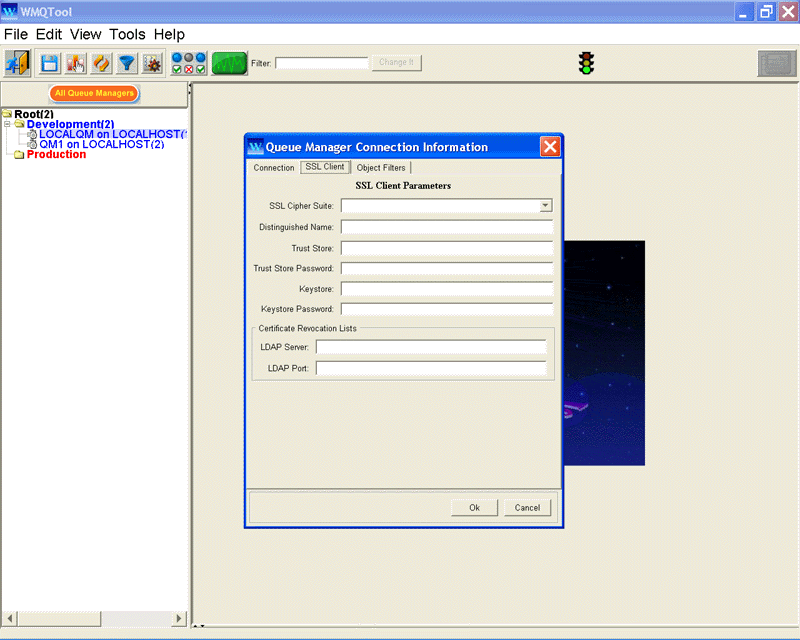
If your queue manager is secured with SSL, you need to provide the Client Certificate information here. Fill in the required fields to set SSL.
Object Filters:
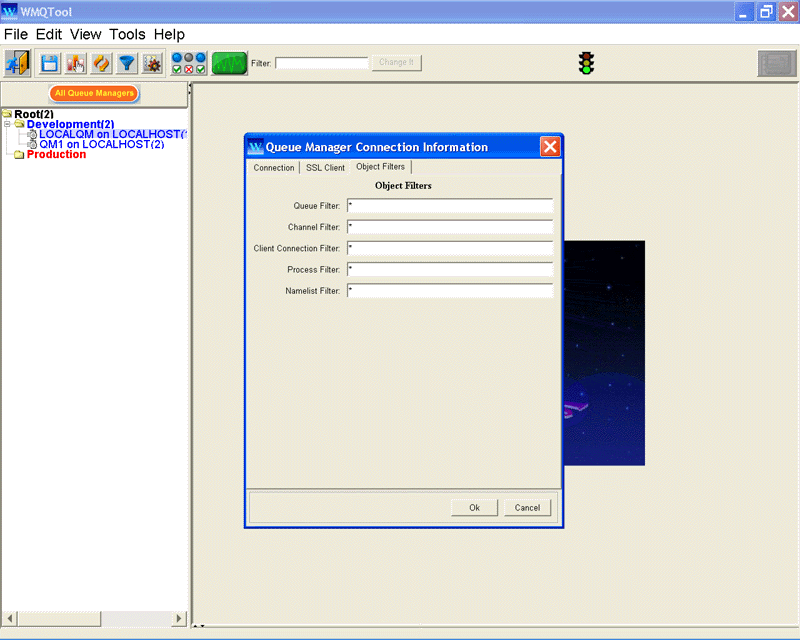
You may want to enter a wild card to filter out objects. By default an asterisk (*) is entered. With the asterisk (*) set, all the objects are inquired. If you set anything which meets any of the objects on the queue manager, it will be listed in the object view. For example, if you enter "QL*" as Queue Filter, it will show you only queues having first two letters as "QL". In all actions on that queue manager for those objects (e.g. Queues), WMQTool will use this filter. Even refreshing all queues also use this filter. This is very useful when there a large number of objects on the queue manager.
The 'Filter Objects' button on the toolbar
![]() has little different
functionality than setting the filter above. If you set 'Filter
Objects', WMQTool still inquires all of the objects on the queue
manager and then filters out the objects. This leads to take a lot
of time in inquiring the objects to queue manager resulting in longer
waits. Only advantage is in display. The object list is of
only desired objects.
has little different
functionality than setting the filter above. If you set 'Filter
Objects', WMQTool still inquires all of the objects on the queue
manager and then filters out the objects. This leads to take a lot
of time in inquiring the objects to queue manager resulting in longer
waits. Only advantage is in display. The object list is of
only desired objects.
You may want to set both the types of filters too, if that is your requirement.
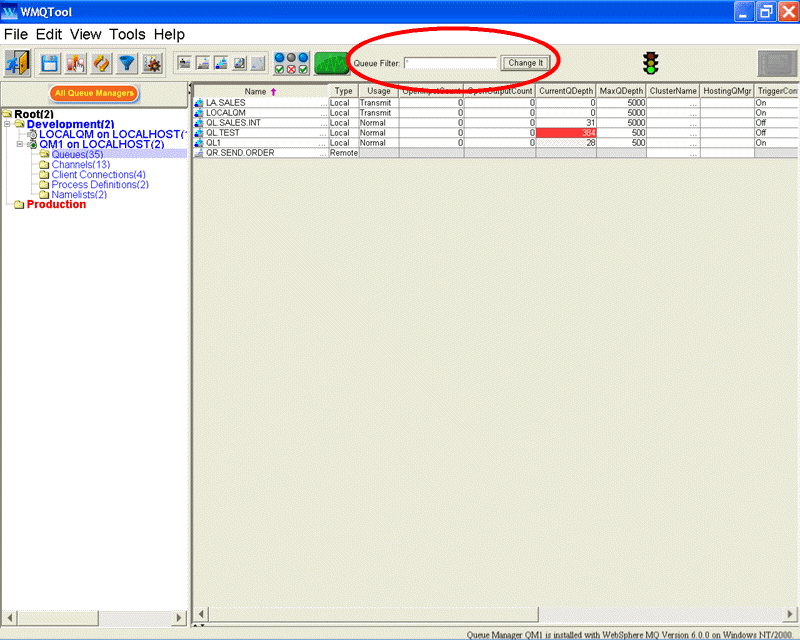
If you want to set the filter temporarily or when you are viewing the objects, you can change the filter value instantly as follows.
In 'Queue View', click on 'Change it' button. The 'Queue Filter' field gets activated.
Enter the filter you want in Queue Filter field. Then click on 'Save it' button. All queues will be refreshed as per the filter value set.
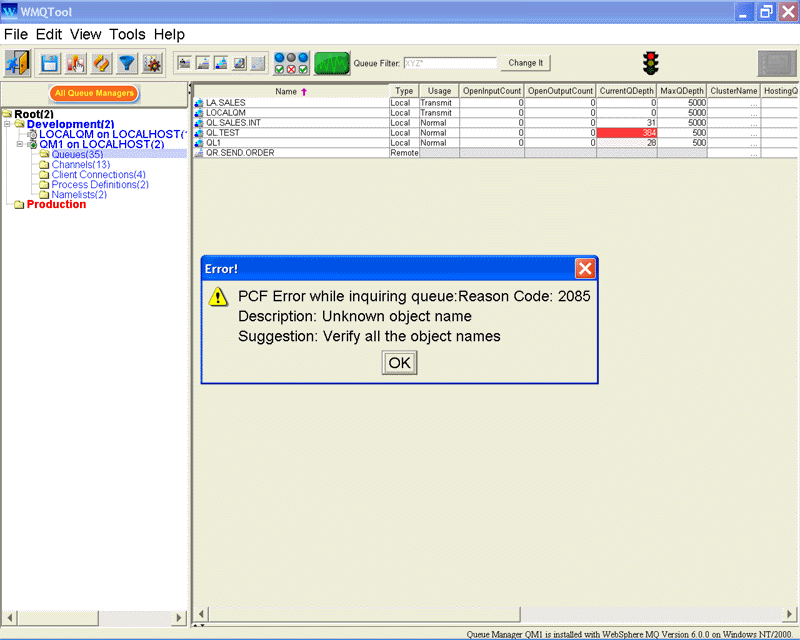
If you provide a wild card which does not match any of the queue, it will show you following error.
|
3. |
Click on ‘Ok’ button will add a new entry under the category you selected on the tree on the left window. It will be automatically placed alphabetically under the same category. |
You may add as many entries of queue managers as you want. You may also add more than one entries for same queue manager name but different host name and/or port number.
Add a Remote Queue Manager:
You may not have permissions to connect to a queue manager directly. But you may be able to administer the queue manager by setting it as 'Remote Queue Manager' on another queue manager where you have got permission to connect. To set up a remote queue manager, following steps are required.
For understanding, call 'QM1' as the queue manager you can directly connect and call 'QM_R1' as the remote queue manager. Now do as follows.
On Queue Manager QM1:
Create a Transmission Queue 'QM_R1'.
Create a Sender Channel QM1.QM_R1 using server name of 'QM_R1' queue manager as 'ConnectionName' and 'QM_R1' as Transmission Queue.
On Queue Manager QM_R1.
Create a Receiver Channel with name QM1.QM_R1.
There must be all authorities to your userid to SYSTEM.ADMIN.COMMAND.QUEUE and SYSTEM.DEFAULT.MODEL.QUEUE on QM_R1 queue manager.
Before adding a Remote Queue Manager, you must add queue manager 'QM1' first.
To set a Remote Queue Manager, right click on the category and select 'Add Remote Queue Manager' option.
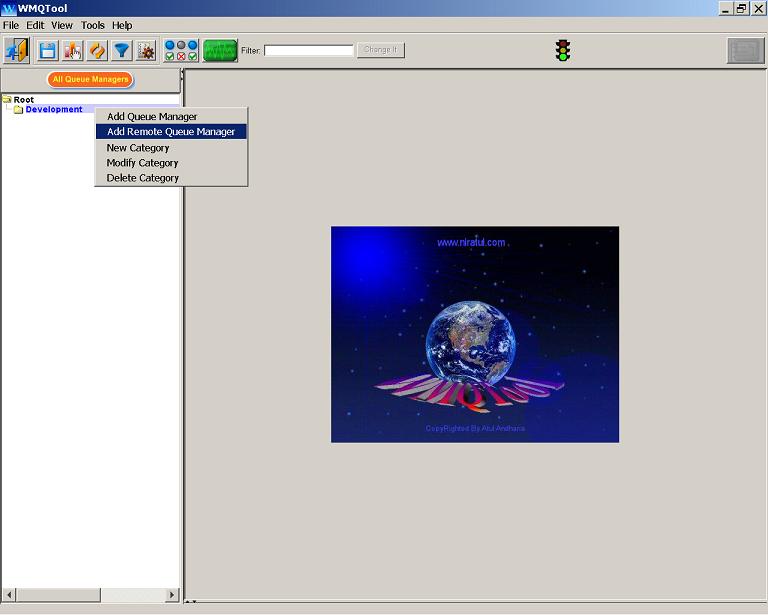
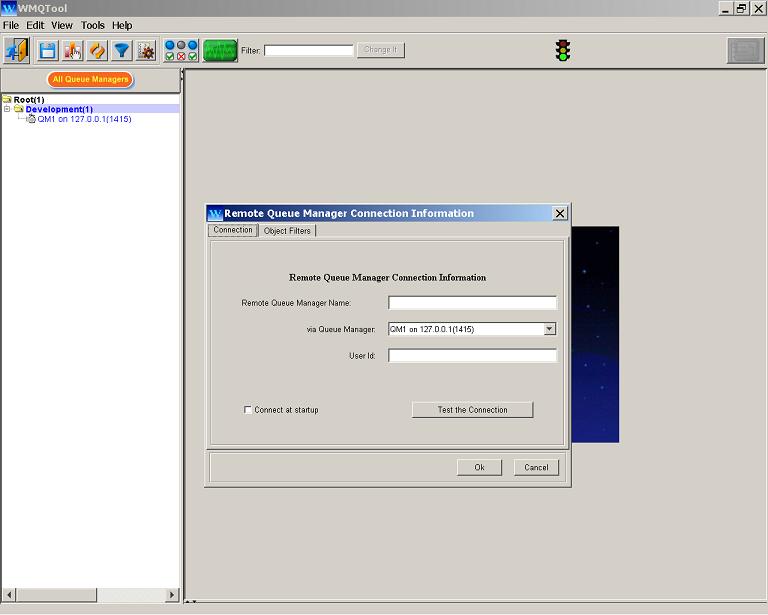
In the displayed window, enter the following fields.
Remote Queue Manager Name: Enter the name of the Remote Queue Manager Name you want to connect, QM_R1.
via Queue Manager: Select the queue manager via you want to set. To get the entry in the dropdown list, you must 'Add Queue Manager' first in the queue manager tree on the left.
User Id: This user id will be used to connect the Remote Queue Manager.
Connect at startup: Mark this checkbox if you want to automatically start the queue manager when you start the tool.
Test the Connection: Click on this button to check if the queue manager can be connected successfully.
Object Filters: The options on this tab page are same mentioned above.
When you connect this queue manager, it will show the objects of the Remote Queue Manager as follows.

Moving Queue Manager to another category:
If you want to change the category of a queue manager, you may simply do it by drag and drop of that queue manager to the new category or select 'Move QM to a Category' from the menu option given by right clicking on the queue manager entry as follows.
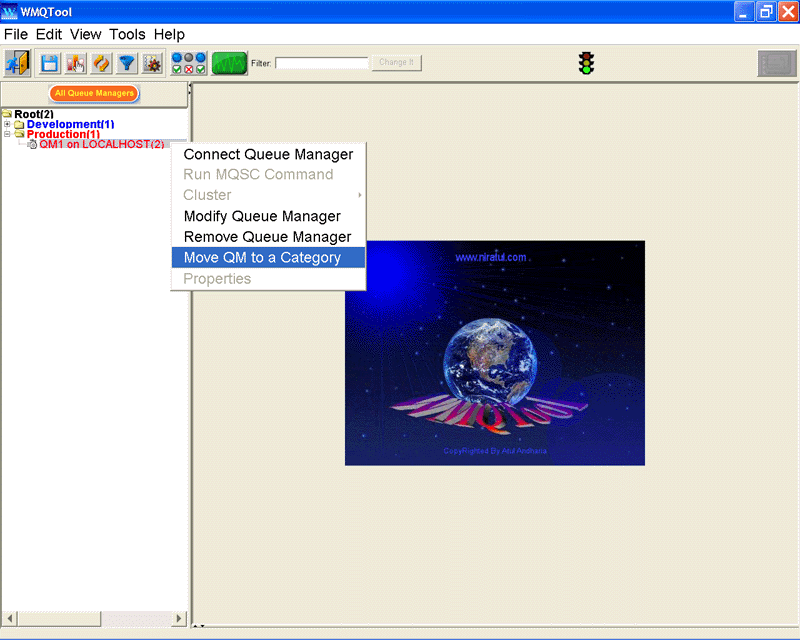
This is particularly useful when it is very difficult to drag and drop queue manager on a category in a very long list of categories on the tree. It displays the whole category tree (having only categories) and asks you to pick the desired category.
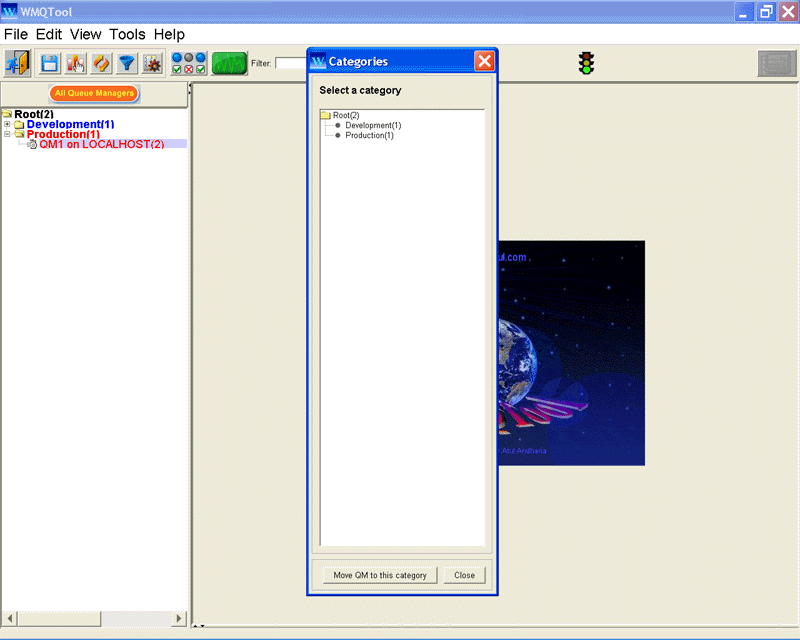
Once you select the category, click on 'Move QM to this category' button. The queue manager will be moved under this selected category.
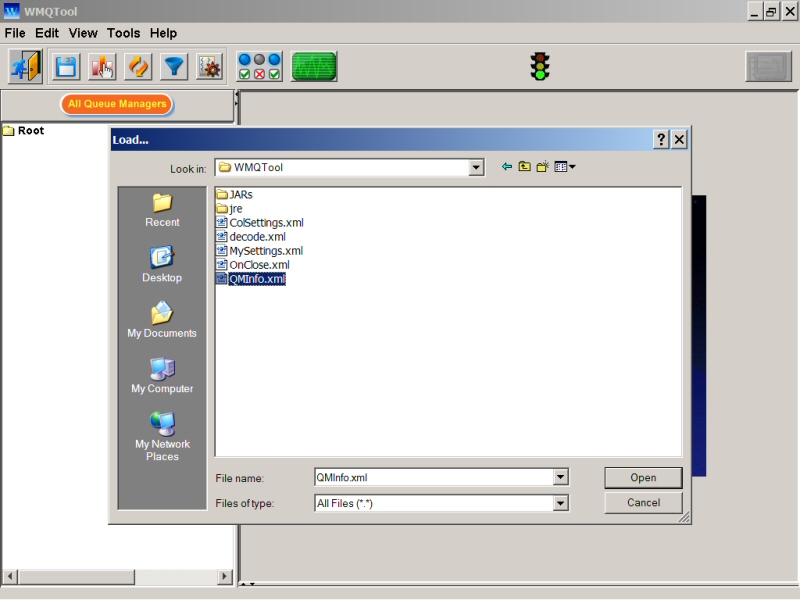
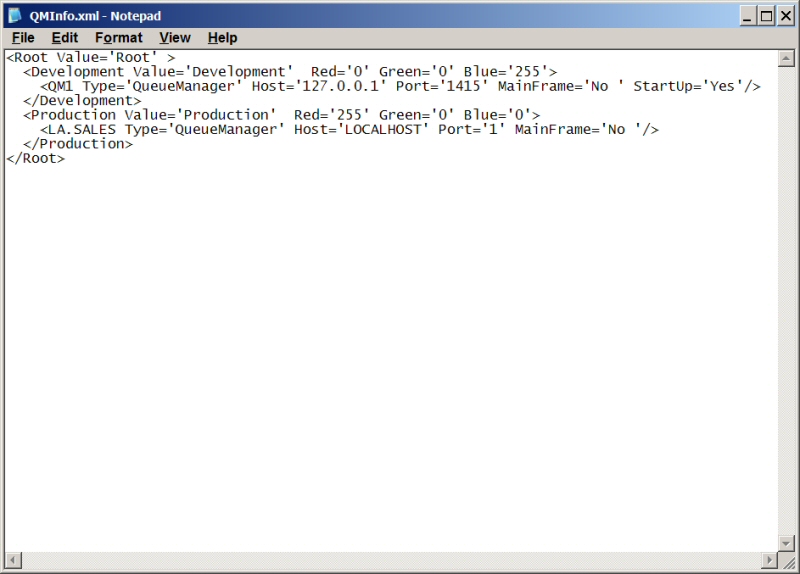
Importing Queue Manager Information from an XML document:
If you have to enter a considerably large number of queue managers, you may want to create an XML document on your own so that you can directly import all the connection information from it.
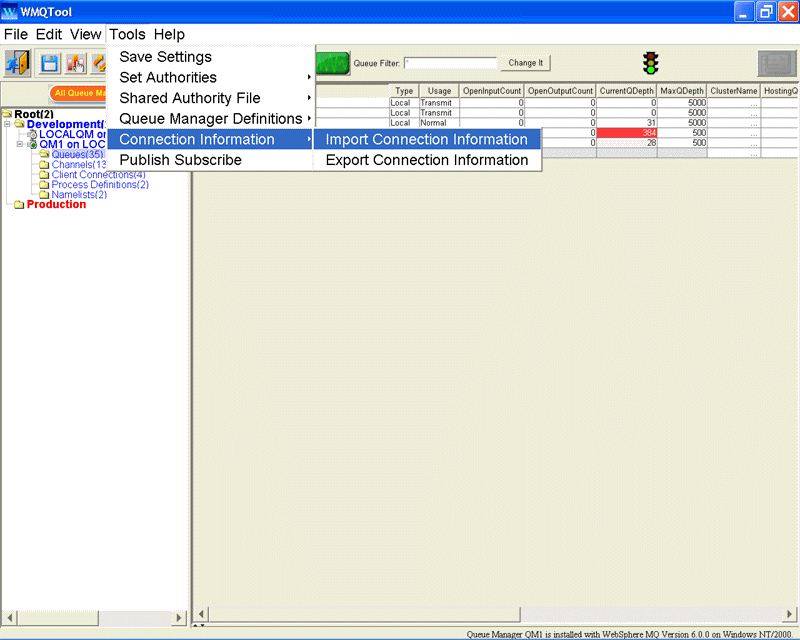
This XML document must be created as per certain rules and structure. Please refer to 'Set Authorities' section of the document for more information about this XML document.
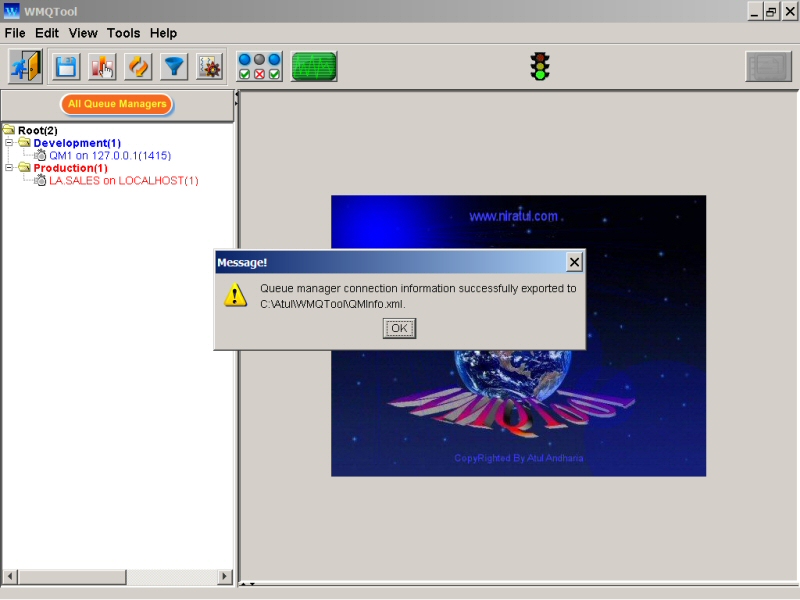
Exporting Queue Manager Information to an XML document:
You may want to export all your queue manager connection information to a file for backup or other purposes.
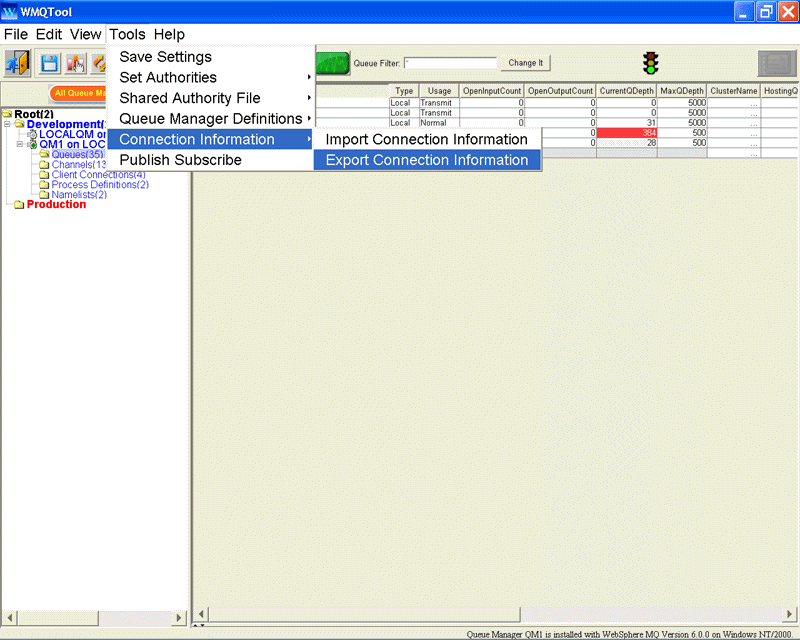
An XML document will be created with all the connection information.
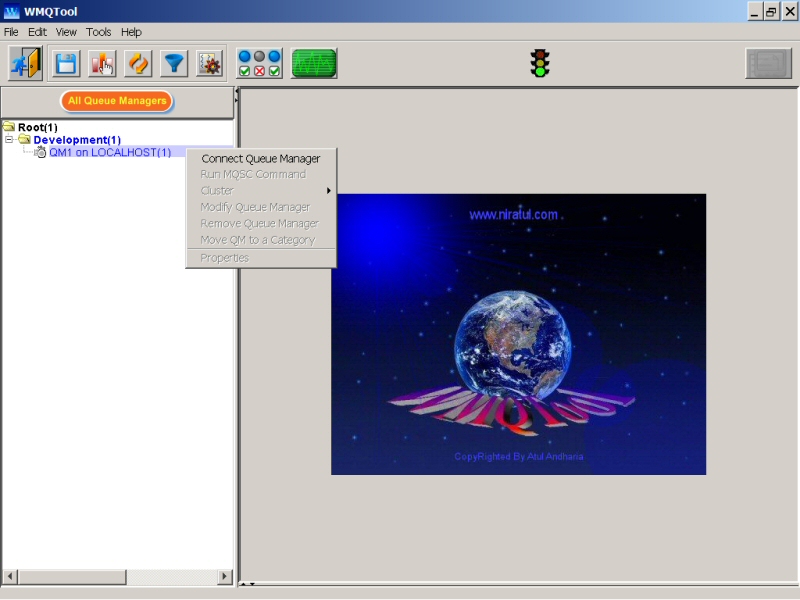
Once you have added the entry for a queue manager, you have to connect it to work with all the objects in it.
This option will only be activated if the queue manager is not yet connected.
|
1. |
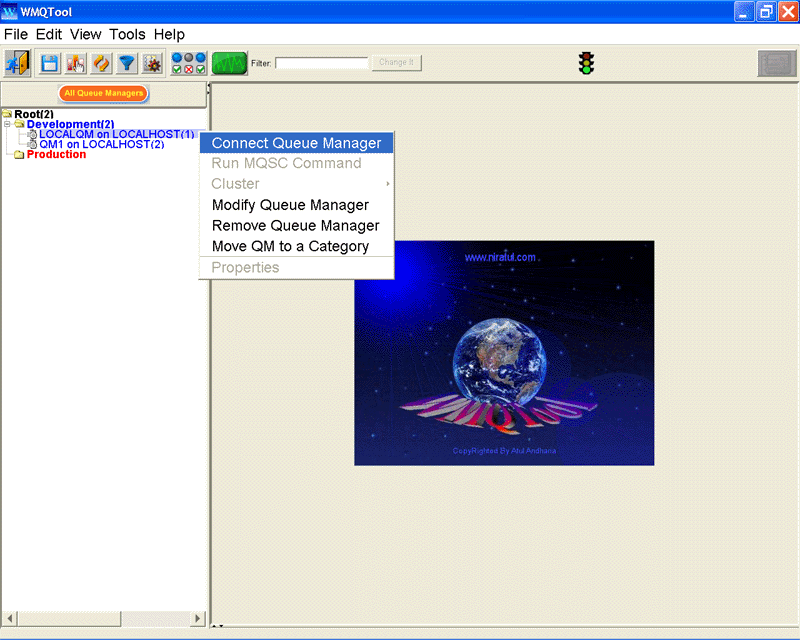
Right click on the entry of the desired queue manager on the tree. It will popup a menu. |
|
2. |
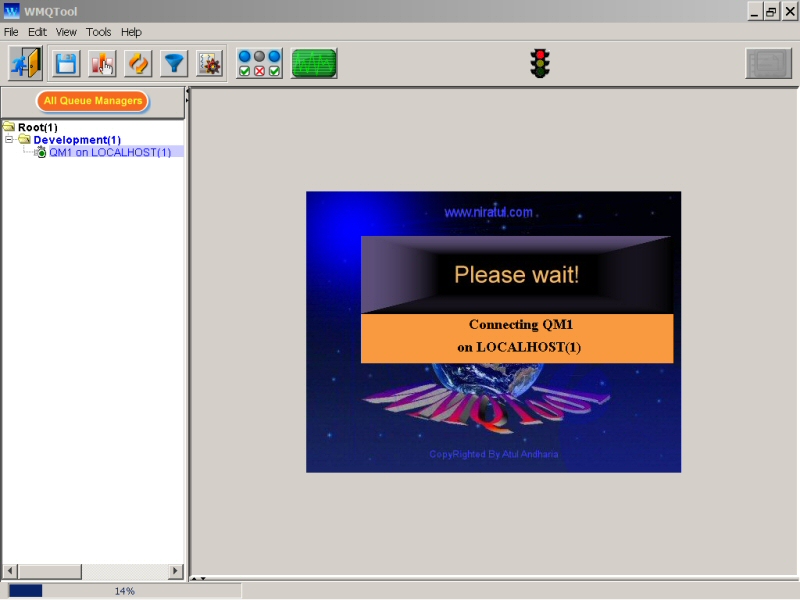
Click on ‘Connect Queue Manager’. A small window displaying message ‘Please wait…’ and the connecting host name and queue manager is displayed for few seconds until the queue manager is connected. |
If you cannot connect with ver 4.0 and you were able to connect a queue manager with earlier releases, it means that WMQTool was used to connect that queue manager thru SYSTEM.DEF.SVRCONN channel. In this case, you should do any one of the following.
|
1. |
Create a server connection channel that of queue manager name. |
|
2. |
Create the server connection channel SYSTEM.ADMIN.SVRCONN. |
|
3. |
Create a user-defined named server connection channel and enter that name into the 'Channel' field in the above screen. |
When you install the WMQTool first time and try to connect any queue manager, you may see following error message on the screen.
"It looks like Security Exit is set. To get authorized, you need to SAVE 'authorities' by selecting Tools/Set Authorities.

This means that a Security Exit is installed on the queue manager server connection channel to which you are trying to connect. To connect it successfully, you need to set your authorities and create a 'key' file specifically for your user id. If you are not authorized to that queue manager, alternatively, you can get this file created by an authorized person and place it in WMQTool folder. For more information, please refer to the section 'Setting Authorities'.
While connecting the queue manager, if the Command Server is not running for that queue manager, you will see an error message like following.
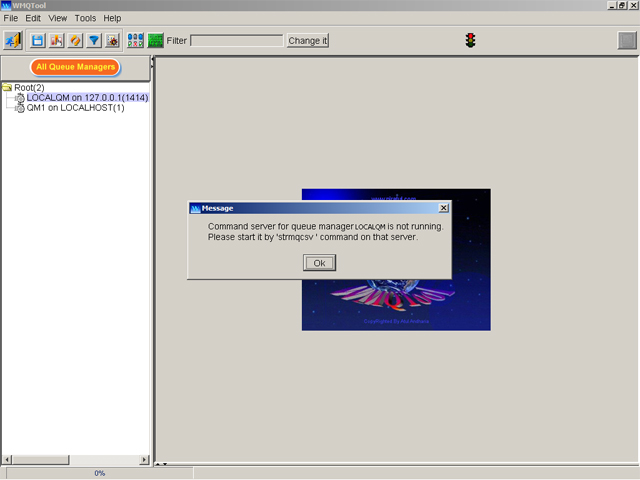
You may need to start the Command Server by entering following command. In Windows NT/2000, you can enter it through Command window.
strmqcsv <queue_manager>
When
the queue manager is being connected, the 'Traffic Signal' sign ![]() will turn
red during this time. This signal will turn red everytime WMQTool sends
a request to any server/queue manager and will turn back green when
it receives the reply back. This is to indicate the user that WMQTool
is waiting for server response on your request. If it is red, the whole
screen freezes. You will not be able to do anything until it turns back
green.
will turn
red during this time. This signal will turn red everytime WMQTool sends
a request to any server/queue manager and will turn back green when
it receives the reply back. This is to indicate the user that WMQTool
is waiting for server response on your request. If it is red, the whole
screen freezes. You will not be able to do anything until it turns back
green.
There will be one progress bar at the left bottom corner stating the percentage of connection to the queue manager. A connection to a queue manager involves number of activities like connecting to the queue manager, inquiring queue manager properties, inquiring queues, inquiring channels, inquiring channel status, inquiring processes and inquiring namelists.
The progress bar will disappear after the queue manager is connected. The icon against the queue manager entry in the tree now displays ‘green’ light. If this queue manager is a Repository Queue Manager (Refer to Queue Manager Clusters to know more about Repository Queue Managers), a red ring surrounding the 'green' light will be displayed.
The right bottom corner will display a one sentence message which will indicate that currently which queue manager is selected, what version of MQSeries/WebSphere MQ is installed in it, and on what platform it is installed. If it is a repository queue manager, it will also indicate that it is a Repository Queue Manager.
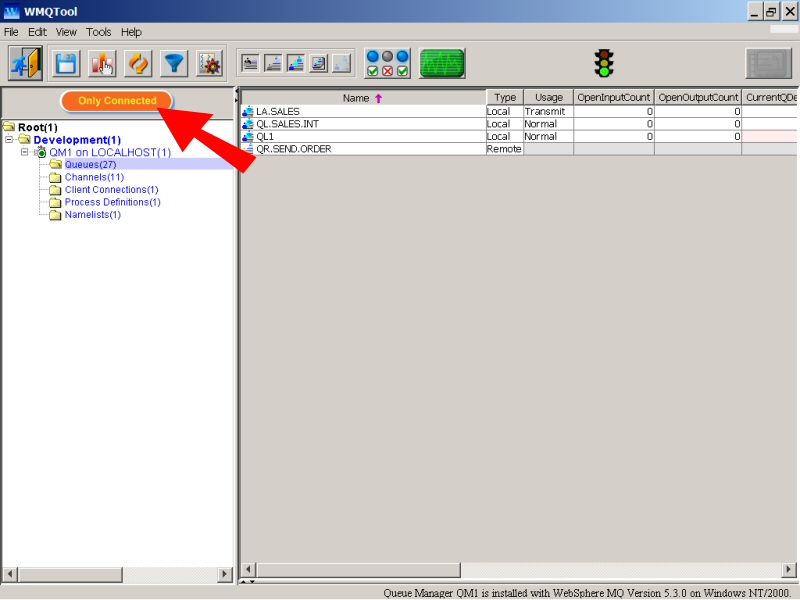
The queue manager node will automatically have five children, Queues, Channels, Processes, Client Connections, Process Definitions and Namelists.
It will be automatically expanded and 'Queues' will be selected to display Queues view by default. You may click on any of this five entries and the view of it will be displayed on the right window. You may want to view only 'Connected' queue managers. Click on the button above the queue manager tree labeled as 'All Queue Managers' and you will see only connected queue managers.
This option will only be activated if the queue manager is connected.
|
1. |
Right click on the entry of the desired queue manager on the tree. It will popup a menu. |
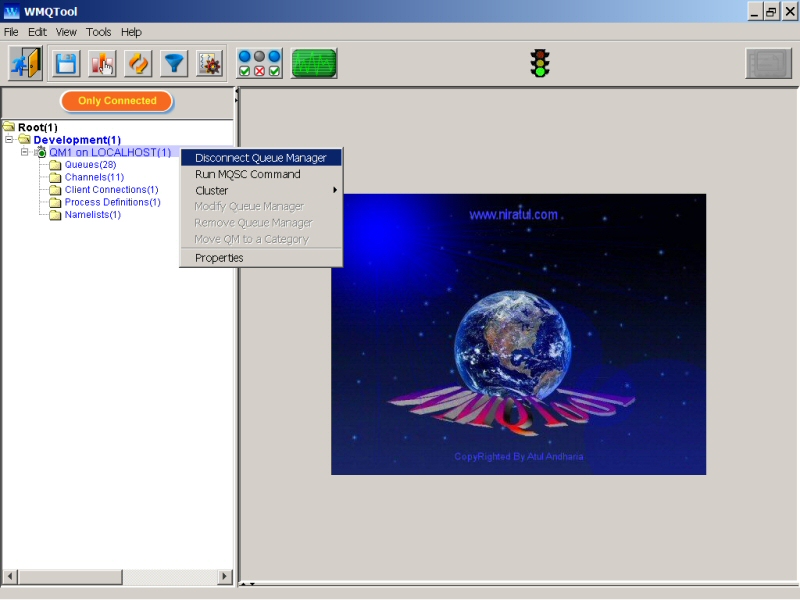
|
2. |
Click on ‘Disconnect’. It will immediately remove all 5 nodes under that queue manager entry and the queue manager icon will turn back to gray. |
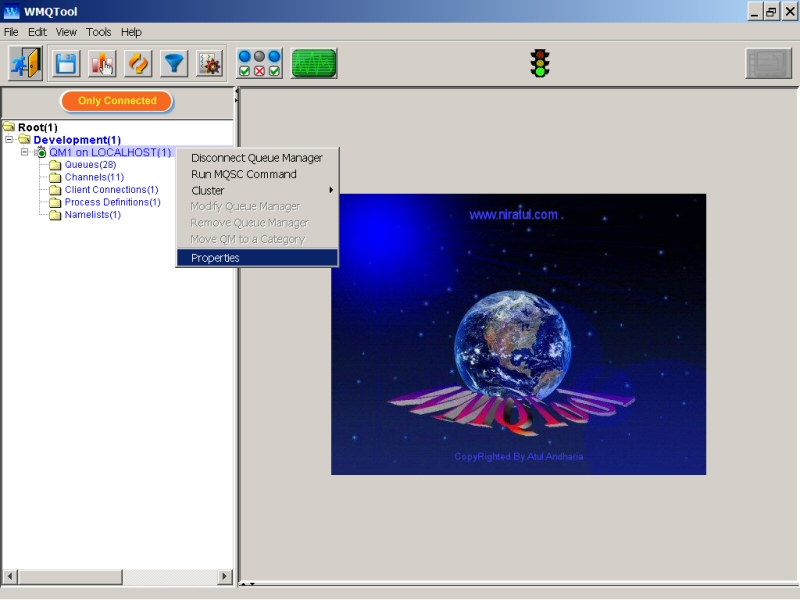
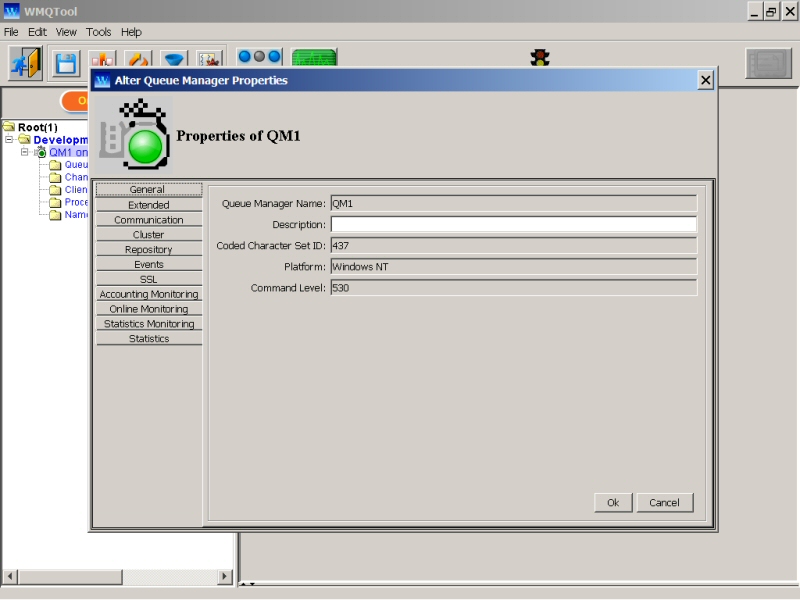
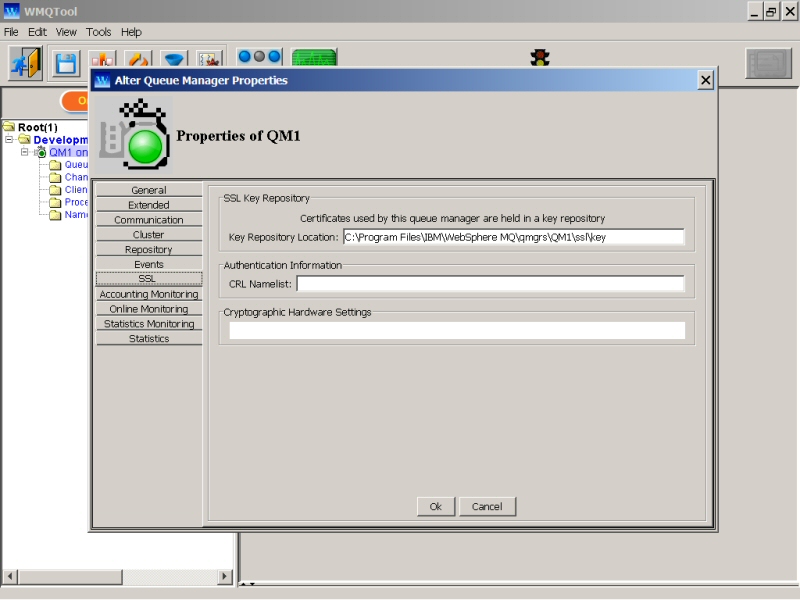
Changing/Viewing Properties of Queue Manager:
This option will only be activated if the queue manager is connected.
|
1. |
Right click on the entry of the desired queue manager on the tree. It will popup a menu. |
|
2. |
Click on ‘Properties’. A new window will open with General, Extended, Cluster, Communication, Events and Statistics tab pages. You may change any of the properties and click on ‘Ok’ to confirm changes or click on ‘Cancel’ to abort the changes. |
Here you can find this queue manager is member of which clusters. Select the 'Cluster' tab page and it will display you all the information about cluster membership.
Modifying Queue Manager Connection Information:
This option will only be activated if the queue manager is not connected.
|
1. |
Right click on the entry of the desired queue manager on the tree. It will popup a menu. |
|
2. |
Click on ‘Modify Queue Manager’ option. It will display a new window with existing connection information. Update the desired fields and click ‘Ok’ to confirm or ‘Cancel’ to abort it. |
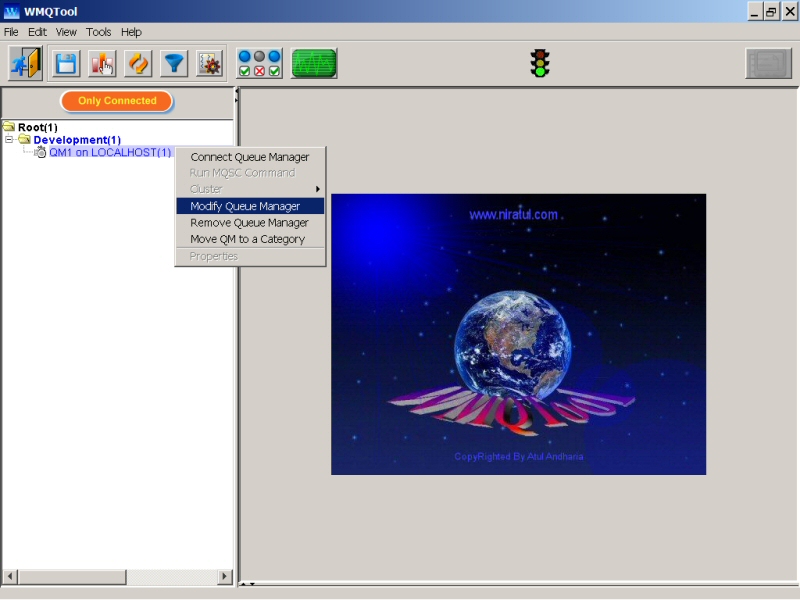
If you see 'Modify Queue Manager' option deactivated like follows, it means that you are using a 'shared file' to define connection information. So you need to modify this queue manager connection information in the shared file by Tools/Set Authorities/Shared File and then click on 'Queue Manager Tree' button.
|
1. |
Right click on the entry of the desired queue manager on the tree. It will popup a menu. |
|
2. |
Click on ‘Remove Queue Manager’. It will display a small window asking to confirm removing the queue manager. |
|
3. |
Select 'Yes' to confirm. It will remove the queue manager entry completely from the tree. |
When a queue manager is connected, you can enter an MQSC command and get the response back instantly in the window. This is as good as you execute WebSphere MQ control command 'runmqsc' running on the MQ server. You can send MQSC command to virtually all the queue managers. This is particularly helpful when you think that a particular MQSC command feature is not provided in WMQTool or it is giving error or not working for some reason. You may want to cut and paste the output received in that window for your own purpose.
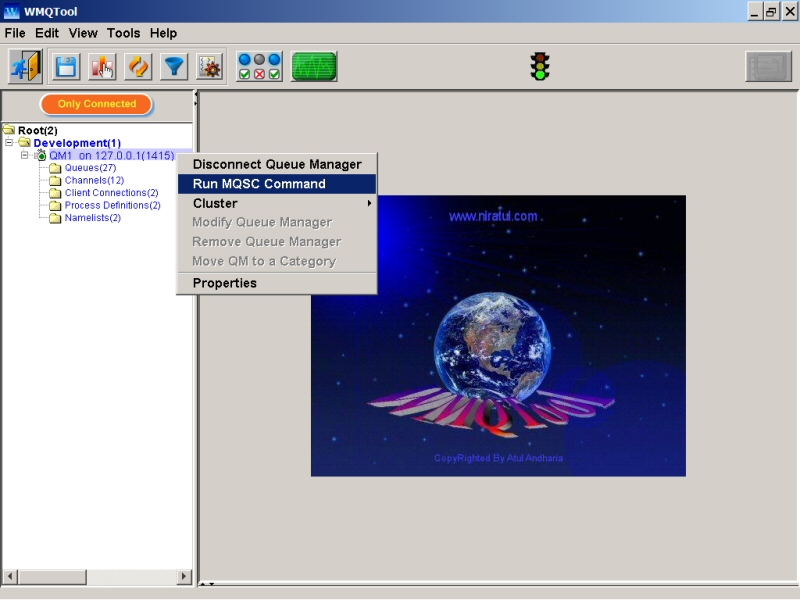
To run an MQSC Command, right click on the queue manager when it is connected and select 'Run MQSC Command'. A window will be opened where you can enter an MQSC command.
Enter the command you want to run in the window and then click on 'Send MQSC Command' button. The response of the queue manager on that command will be displayed in the same window just below your command.
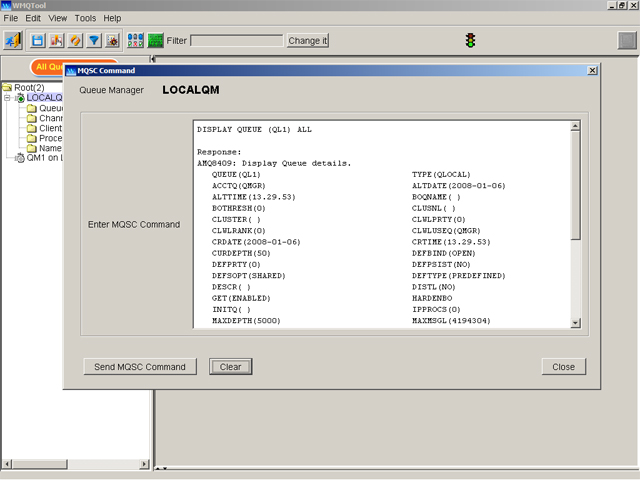
To enter another command, click on 'Clear' button. The window will be cleared and 'Send MQSC Command' button will be again activated. Click on 'Close' button when you are done.
Suspend/Resume Queue Manager from Cluster
This drop down menu option is only visible to a queue manager if it is a member of a cluster and connected. When you right click on a connected queue manager, menu option 'Cluster' is displayed if the queue manager is a member of a cluster. You may select 'Suspend Cluster' or 'Resume Cluster' depending upon the queue manager status.